Napkin Holder

Materials
- 23 spring-style clothespins
- Paint and paintbrush
- Craft glue
- Clear acrylic spray
Directions
- Have your child pull the clothespins apart and discard the springs.
- Glue the smooth sides of the pieces in each pair together.
- Let the glue dry.
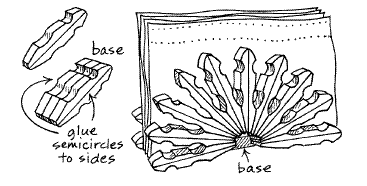
- Lay three pairs on a flat surface so that their sides are touching and glue them together.
- Let the glue dry. This will be the base of the napkin holder.
- Sort the remaining pairs into two sets of ten.
- Arrange each set in a semicircle with the pointed ends touching in the center.
- Glue the parts that are touching and press them together. Let the glue dry.
- The two semicircles will be the sides of the napkin holder.
- Apply glue to the two long outer edges of the base.
- Press the bottom of one semicircle to each side. Let the glue dry.
- Let your child paint the napkin holder.
- Finish it with clear acrylic spray.