25 Fun and Easy Fall Crafts for Kids

Fall is the perfect time to get creative with your little ones. The crisp air, vibrant leaves, and pumpkin-spiced everything provide endless inspiration for crafting. Whether you're looking to spend quality time with your children or want to introduce them to new skills, this listicle has got you covered. Get ready for some fun, laughter, and learning as we explore 25 delightful fall crafts that kids—and parents—will love.
1. Leaf Animals
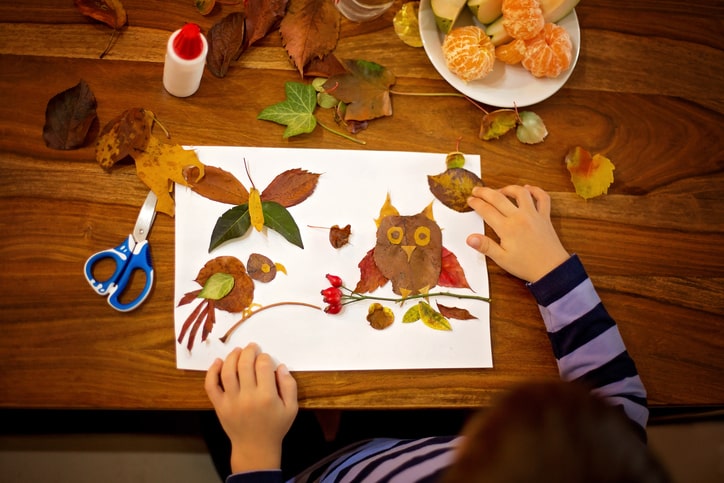
Create adorable animals using colorful fall leaves, perfect for showcasing the beauty of autumn!
Materials:
- Assorted fall leaves in vibrant hues
- Glue (a strong adhesive works best)
- Construction paper (choose a color that complements your leaves)
- Markers (various colors for added detail)
Steps:
- Gather a variety of leaves in different shapes, sizes, and colors to give your animals personality.
- Arrange the leaves on construction paper to form animal shapes (for example, use one large leaf for the body, smaller ones for ears and tail).
- Carefully glue the leaves in place, ensuring they adhere well.
- Use markers to draw eyes, noses, and other features, adding character to your creations.
- Allow the glue to dry completely before displaying your leaf animals proudly.
This craft helps develop creativity and fine motor skills while encouraging appreciation for nature.
2. Pinecone Owls
Turn ordinary pinecones into cute woodland creatures that can bring a touch of charm to your home decor!
Materials:
- Pinecones (look for various sizes to create different types of owls)
- Felt in assorted colors
- Googly eyes (to give your owls a whimsical look)
- Glue (a hot glue gun works best for sturdiness)
Steps:
- Cut out felt pieces for wings, beaks, and feet in fun colors to make your owls pop.
- Glue the felt pieces onto the pinecone, arranging them to create a distinct owl shape.
- Attach googly eyes to bring your owl to life, giving it a playful expression.
- Allow it to dry completely before displaying your new feathered friends.
This craft is perfect for enhancing hand-eye coordination and encouraging imaginative play.
3. Acorn Painting
Use acorns to create unique art pieces that celebrate the beauty of nature and stimulate creativity!
Materials:
- Acorns (look for smooth and varying sizes)
- Paint in an assortment of colors
- Paper (thicker paper works best for this project)
- Tray (to keep the workspace tidy)
Steps:
- Dip acorns in different colors of paint, allowing the colors to mix for vibrant effects.
- Place a piece of paper in a tray to catch any excess paint.
- Roll the acorns around the paper, allowing them to create abstract designs as they move.
- Set aside the decorated paper to dry completely before showcasing your artwork.
This activity engages sensory exploration and encourages creativity through play.
4. Pumpkin Seed Mosaics
Craft beautiful mosaics using pumpkin seeds to create stunning visuals that can brighten up any space!
Materials:
- Colored pumpkin seeds (dyed using non-toxic food coloring)
- Glue (a strong adhesive for better bonding)
- Cardboard (a sturdy base for your mosaic)
Steps:
- Dye pumpkin seeds using food coloring, ensuring they are vibrant, and allow them to dry thoroughly.
- Draw a simple design on cardboard, such as a flower or geometric pattern, to guide your arrangement.
- Glue the seeds onto the cardboard, carefully placing them to form a cohesive mosaic.
- Allow to dry completely before displaying your artistic masterpiece.
Great for teaching patterns, color recognition, and sequencing while fostering creativity.
5. Apple Stamping
Make art with apple slices and paint, exploring the fun of printing while creating beautiful designs!
Materials:
- Apples (choose firm ones for clean cuts)
- Paint in a variety of colors
- Paper (heavyweight or art paper works best)
Steps:
- Cut apples in half to create stamps, ensuring a flat surface for even prints.
- Dip the flat side of the apple into paint, covering it generously.
- Press the apple onto paper to make prints, experimenting with pressure for different effects.
- Experiment with various colors and patterns to create a vibrant art piece!
An excellent way to learn about textures, shapes, and color mixing while having fun.
6. Corn Husk Dolls
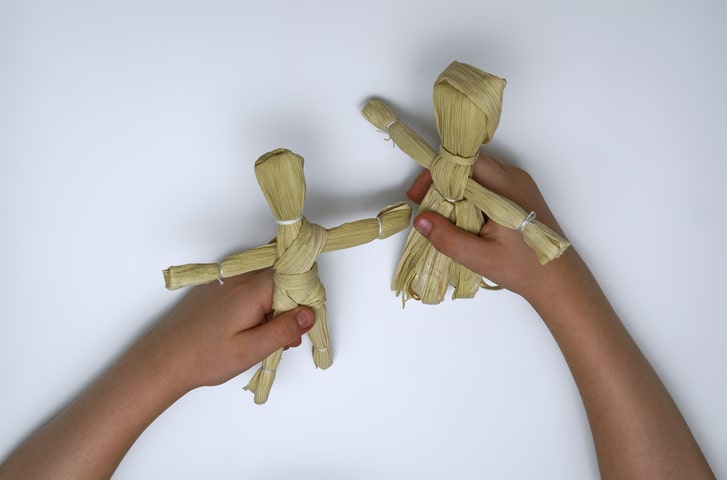
Craft traditional dolls from dried corn husks, an engaging way to explore cultural heritage and creativity!
Materials:
- Dried corn husks (look for large and pliable ones)
- String (to secure the doll parts)
- Scissors (for trimming and shaping)
Steps:
- Soak corn husks in water to soften them, making them easier to work with.
- Fold and tie the husks to form a body and arms, creating a simple doll shape.
- Trim any excess husk to refine the shape of the doll, giving it a neat appearance.
- Allow to dry completely before displaying or playing with your doll.
This cultural craft promotes historical awareness, fine motor skills, and creativity.
7. Leaf Rubbing Art
Capture the beauty of leaves with crayons, creating unique art pieces that celebrate nature.
Materials:
- Leaves: Choose various shapes and sizes for a diverse collection.
- Paper: Use plain white paper or colored paper for different effects.
- Crayons: Select a range of colors to enhance the artistic experience.
Steps:
- Place a leaf under a piece of paper, ensuring it lies flat for an even texture.
- Rub a crayon over the paper, applying gentle pressure to reveal the leaf's intricate patterns and textures.
- Experiment with different leaves and colors for variety, creating a vibrant display of nature.
This activity enhances tactile learning and artistic skills, allowing for creative expression.
8. Twig Picture Frames
Create rustic frames using twigs, perfect for showcasing your favorite photos or artwork.
Materials:
- Twigs: Collect twigs of varying lengths and thicknesses for an organic look.
- Glue: Use strong craft glue or a hot glue gun for secure adhesion.
- Cardboard: Recycle old boxes to cut into frame shapes.
- String: Choose a natural twine or colorful string for a decorative touch.
Steps:
- Cut cardboard into frame shapes, ensuring a secure opening for your photo.
- Glue twigs around the edges, arranging them artfully for a unique design.
- Attach a string loop for hanging, ensuring it is secure enough to hold the frame.
- Allow to dry completely before displaying your artwork.
This project encourages resourcefulness and appreciation of nature's materials.
9. Pumpkin Play Dough
Make your own scented play dough that brings the essence of fall indoors.
Materials:
- Flour: All-purpose flour works best for a smooth dough.
- Salt: This will help preserve the dough and add texture.
- Water: Use warm water to help dissolve the ingredients.
- Pumpkin spice: Adds a delightful scent reminiscent of autumn.
- Food coloring: Choose a vibrant orange to mimic real pumpkins.
Steps:
- Mix flour, salt, and water in a bowl to form a dough, adjusting water as necessary for consistency.
- Add food coloring and pumpkin spice, mixing thoroughly to achieve an even color and scent.
- Knead the dough until smooth and pliable, ensuring a great sensory experience.
- Store in an airtight container to keep it fresh for future play.
This activity promotes sensory development and enhances fine motor skills.
10. Button Trees
Design colorful trees with buttons, turning simple materials into fun wall art.
Materials:
- Buttons: Gather an assortment of buttons in various colors and sizes.
- Glue: Use craft glue that dries clear for a neat appearance.
- Canvas: Choose a blank canvas as your base, providing a sturdy surface for your artwork.
- Paint: Use acrylic or watercolor paint to create the tree trunk and branches.
Steps:
- Paint a tree trunk and branches on a canvas, allowing it to dry completely before proceeding.
- Glue buttons onto the branches to represent leaves, arranging them to create a vibrant canopy.
- Allow the glue to dry fully before displaying your masterpiece.
This creative endeavor fosters color recognition and nurtures creativity.
11. Pinecone Bird Feeders
Feed the birds with homemade feeders, providing nourishment while connecting with nature.
Materials:
- Pinecones: Choose sturdy pinecones that will hold up outside.
- Peanut butter: Use creamy peanut butter for easy spreading and better adherence.
- Birdseed: Select a mixture of seeds that attract local bird species.
- String: Choose a durable string or twine for hanging the feeders.
Steps:
- Tie a string around the top of a pinecone, making a loop for hanging.
- Coat the pinecone generously in peanut butter, ensuring it is well-covered.
- Roll the pinecone in birdseed, pressing down to help the seeds stick.
- Hang outside in a tree or on a feeder, watching as birds enjoy their treat.
This activity encourages environmental awareness and empathy towards wildlife.
12. Yarn Pumpkins
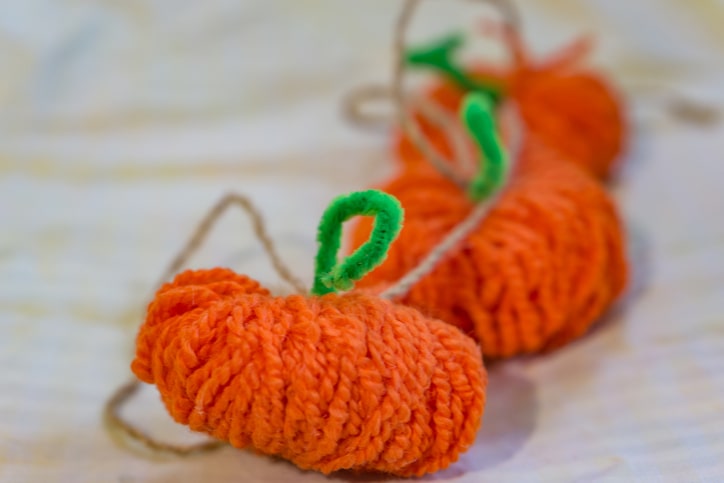
Fashion pumpkins from yarn, a fun project that adds a festive touch to your decor.
Materials:
- Orange yarn: Use a thick yarn for a fuller pumpkin appearance.
- Balloons: Choose balloons in various sizes to create different pumpkin sizes.
- Glue: Use white school glue or a glue mixture suitable for fabric.
- Green paper: Cut leaves and stems from green paper for added detail.
Steps:
- Inflate a balloon to the desired size, tying it securely.
- Dip yarn in glue and wrap it around the balloon, overlapping layers for fullness.
- Allow it to dry completely, then pop and carefully remove the balloon.
- Cut green paper for leaves and attach them to the top, completing the pumpkin look.
This project improves fine motor skills and patience while creating charming fall decorations.
13. Apple Scented Candles
Create delightful homemade candles infused with the warm, inviting scent of apples. These candles not only fill your space with a pleasant aroma but also provide a cozy atmosphere.
Materials:
- Wax (choose soy or paraffin based on your preference)
- Candle wicks (ensure they are the right size for your jars)
- Apple scent (essential oils or fragrance oils)
- Mason jars (various sizes for different candle effects)
Steps:
- Start by melting the wax in a double boiler, ensuring it reaches a temperature of about 170°F. Once melted, mix in the apple scent, using a few drops until you achieve your desired fragrance strength.
- While the wax cools slightly, place a wick in the center of each mason jar, securing it with a bit of wax or adhesive to keep it in place.
- Carefully pour the scented wax into the jars, filling them to your desired height. Leave a little space at the top for safety. Allow the candles to set for several hours until completely hardened.
These homemade candles not only brighten your space but also instill an understanding of chemistry and creativity as you experiment with scents and shapes.
14. Paper Plate Scarecrows
Craft adorable scarecrows using simple materials like paper plates, perfect for autumn decorations or fun crafts with kids!
Materials:
- Paper plates (preferably sturdy ones)
- Paint (acrylic or washable)
- Felt (various colors for added fun)
- Googly eyes (to give your scarecrow personality)
Steps:
- Start by painting the paper plate to create a cheerful face; let your imagination run wild with colors and expressions!
- Next, cut out various shapes of felt to form a hat, nose, and mouth, gluing them onto the plate to complete the face.
- Add googly eyes for an extra playful touch that brings your scarecrow to life.
- Allow your creation to dry completely before displaying it.
This craft not only encourages creativity but also develops storytelling skills as you can create a background narrative for your scarecrow.
15. Felt Leaf Garland
Design a vibrant and festive garland adorned with colorful felt leaves, perfect for enhancing your home decor during the fall season.
Materials:
- Felt (in various autumn colors like red, orange, yellow, and green)
- Scissors (to cut your leaf shapes)
- String (twine or yarn works well for a rustic look)
Steps:
- Start by cutting leaf shapes out of the felt. You can create different types of leaves for variety or stick to one kind for uniformity.
- Carefully pierce a small hole in each leaf and thread them onto the string, spacing them out as desired.
- Once complete, hang your garland across a mantle, window, or wall to bring a touch of nature indoors.
This activity not only encourages spatial awareness and design skills but also adds a lovely autumn touch to your space.
16. Harvest Collage
Create beautiful collages using fall-themed pictures and materials, celebrating the beauty of the season through art.
Materials:
- Magazines (gather a variety that includes fall themes)
- Glue (school glue or a glue stick)
- Construction paper (for the collage base)
- Scissors (to cut out images)
Steps:
- Begin by cutting out images that resonate with the autumn theme from the magazines—think pumpkins, leaves, and cozy scenes.
- Arrange these cut-outs creatively on a piece of construction paper, playing with the layout until you’re satisfied.
- Once arranged, glue the images down, and consider adding natural materials like leaves or twigs for added texture and depth.
This project cultivates creativity and visual storytelling, allowing you to express your appreciation for the season.
17. Nature Bracelets
Make unique bracelets using natural finds from your outdoor adventures, celebrating nature’s beauty while crafting.
Materials:
- Tape (wide masking tape or duct tape works best)
- Leaves (various shapes and sizes)
- Flowers (small, delicate blooms for decoration)
Steps:
- Start by wrapping a strip of tape around your wrist, ensuring the sticky side is facing out—this will hold your nature finds.
- Collect and carefully attach leaves and small flowers to the tape, layering them for a beautiful arrangement.
- Once you've filled your bracelet with nature's treasures, wear it proudly as a reminder of your creativity and the beauty of the outdoors!
This activity promotes environmental appreciation and creativity, encouraging you to explore and connect with nature.
18. Paper Bag Owls
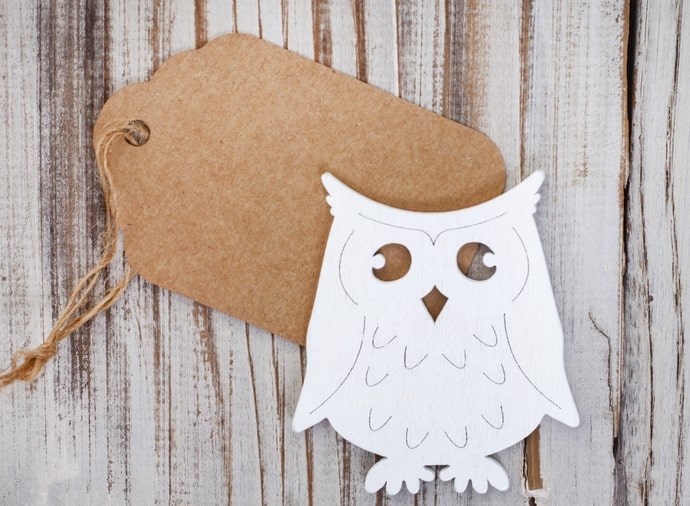
Create adorable owls from simple paper bags for a fun crafting project. This activity not only allows for creativity but also serves as a great way to engage children in art.
Materials:
- Paper bags
- Paint (various colors)
- Felt (in different colors)
- Googly eyes
Steps:
- Start by painting the paper bag with your chosen colors to represent the owl's body, allowing for imaginative designs.
- Cut and glue pieces of felt to create the wings and beak, encouraging kids to explore different shapes and textures.
- Attach the googly eyes to bring your owl to life, making it a fun and friendly craft.
This activity boosts creativity and enhances fine motor skills as children manipulate different materials.
19. Cinnamon Stick Reindeer
Craft festive reindeer ornaments using cinnamon sticks, which not only look adorable but also add a delightful scent to your upcoming Christmas holiday decor.
Materials:
- Cinnamon sticks (large ones work best for the body)
- Pipe cleaners (brown or any festive color)
- Googly eyes (to give your reindeer character)
- Glue (hot glue works well for securing pieces)
Steps:
- Begin by gluing three cinnamon sticks together in a triangular shape to form the reindeer's body.
- Cut pipe cleaners into smaller sections and bend them to create antlers, gluing them securely to the top of the triangle.
- Finally, attach googly eyes and a small pom-pom for the nose to complete your festive reindeer.
This craft enhances creativity and brings holiday spirit into your home, making it a fun activity for all ages.
20. Wooden Spoon Puppets
Transform plain wooden spoons into charming puppets that spark creativity and storytelling. This project is perfect for kids who love to act!
Materials:
- Wooden spoons
- Paint (various colors)
- Fabric scraps (for clothing)
- Glue
Steps:
- Begin by painting the spoon to create a puppet's face, allowing for personalization with different expressions.
- Use glue to attach fabric pieces for clothes, encouraging kids to think about their puppet’s character and style.
- Allow the puppets to dry completely before putting on a show.
This fun craft encourages imagination and storytelling skills, perfect for playtime!
21. Clay Leaf Impressions
Create beautiful leaf impressions in clay, combining nature and art in this engaging activity.
Materials:
- Clay (air-dry or oven-bake)
- Assorted leaves
- Rolling pin
Steps:
- Roll out the clay evenly using a rolling pin to create a smooth surface.
- Press various leaves into the clay to make unique impressions, showcasing different shapes and textures.
- Allow the clay to dry completely, preserving the natural designs.
This project teaches texture exploration and fosters creativity while connecting kids with nature.
22. Felt Acorn Necklaces
Craft whimsical necklaces from felt acorns that can be worn or gifted. This creative project is perfect for enhancing fine motor skills.
Materials:
- Felt (in various colors)
- Beads (assorted shapes and colors)
- String or yarn
Steps:
- Cut out acorn shapes from felt, allowing for creativity in size and color.
- Thread beads and felt acorns onto the string, encouraging kids to create patterns or designs.
- Tie the ends securely to form a necklace that can be worn or shared.
This activity develops fine motor skills and encourages design while making a lovely accessory.
23. Painted Rock Pumpkins
Transform ordinary rocks into festive painted pumpkins, perfect for fall decorations! This project is a great way to celebrate the season.
Materials:
- Smooth rocks (medium-sized)
- Paint (orange, green, and black)
- Brushes (various sizes)
Steps:
- Begin by painting the rocks in vibrant pumpkin colors, using orange as the base.
- Add details such as green stems and fun faces to each pumpkin, allowing for personalized designs.
- Allow the painted rocks to dry completely before displaying them.
This activity fosters creativity and artistic skills while creating lovely decorations for any autumn celebration.
24. Twig Boats
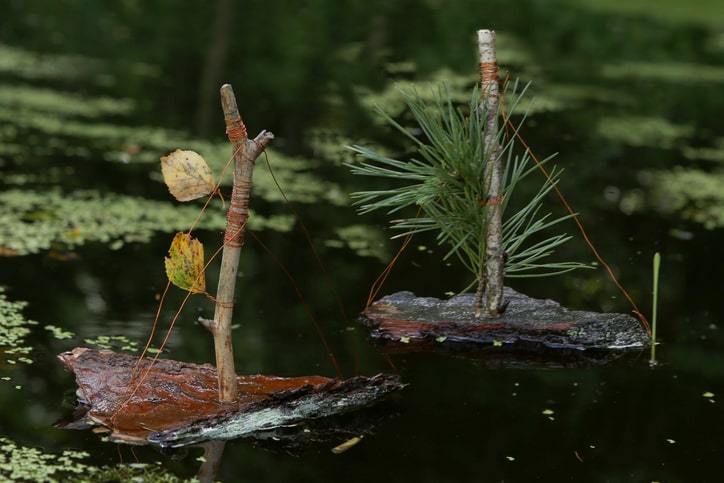
Build tiny boats from twigs and set them afloat in water for a delightful outdoor activity. This project encourages exploration and creativity.
Materials:
- Twigs (various lengths)
- String or twine
- Leaves (for sails)
Steps:
- Gather twigs of different lengths and tie them together to form the boat’s structure.
- Attach a leaf as a sail, experimenting with different sizes and shapes for added fun.
- Test your twig boat in a nearby stream or pool to see it float!
This project improves problem-solving and creativity as kids learn to design functional boats.
25. Coffee Filter Bats
Craft spooky bats from coffee filters for a fun Halloween decoration. This simple project is perfect for kids and adults alike!
Materials:
- Coffee filters
- Black paint
- String (for hanging)
Steps:
- Start by painting the coffee filters black, allowing for a rich color that enhances the bat’s spooky look.
- Once dry, fold the filters to resemble bat wings, letting creativity shine through in their shapes.
- Attach string to hang your bats around the house or for a fun Halloween display.
This fun craft enhances creativity and adds a playful touch to holiday festivities.
Benefits of Crafting in Fall

Crafting during the fall offers more than just a fun pastime; it provides a wealth of educational and developmental benefits that can significantly impact a child's growth. Engaging in activities such as making seasonal decorations, creating handmade gifts, or designing festive cards helps children enhance their fine motor skills, as they manipulate various tools and materials. These hands-on experiences foster creativity by allowing kids to express their unique ideas and explore their imaginations freely.
Furthermore, crafting promotes essential problem-solving abilities as children navigate challenges like figuring out how to assemble their projects or overcome design obstacles. This process encourages critical thinking and perseverance, valuable skills they can apply in various aspects of life.
Additionally, crafting serves as a wonderful opportunity for bonding between parents and kids. Working together on projects creates a collaborative environment where families can share ideas, offer guidance, and celebrate completed works. These shared moments not only strengthen relationships but also create cherished memories that last a lifetime, making fall crafting an enriching experience for everyone involved.
Tips for Crafting with Kids
Crafting with children can be a wonderfully rewarding experience that combines creativity, learning, and fun. To make the most out of these activities, it's helpful to have some guidance on how to effectively engage and inspire young crafters. So, whether you are crafting at home or leading a group project, these helpful pointers will enhance your crafting sessions.
- Prepare Ahead: Gather materials and set up the crafting area before starting.
- Be Patient: Allow kids to explore and express their creativity without rushing.
- Encourage Clean-Up: Teach responsibility by involving kids in tidying up after crafting.
- Celebrate Creativity: Display their creations at home for a confidence boost.
- Offer Guidance: When necessary, provide guidance to help children complete their projects.
- Praise Efforts: Acknowledge the effort and creativity put into each project, not just the final product.
- Keep it Fun: Above all, remember that crafting is a fun activity that should be enjoyable for everyone involved. So, don't worry about perfection or messes; embrace the joy of creating together!
With these tips in mind, you're ready to enjoy a fun and productive crafting session!
Conclusion
Crafting in the fall is a fantastic way to bond with loved ones, tap into your children's creativity, and enjoy the season's festivities. From making seasonal decorations to creating thoughtful gifts, there are endless possibilities for fun and learning. So, gather your materials and get crafting with your kids—the only limit is your imagination! Happy crafting!


